Showing posts with label Meal Planning. Show all posts

Meal Planning With Free Printable

Having dinner as a family has always been a priority in our home. However, just like every busy mom if I don't plan it doesn't happen. Lately it seems between kids activities and our daily busyness I have not been as faithful to my weekly meal planning.

Which means that I find myself scrambling each afternoon as I hear one of my children say "Mom, Whats for dinner tonight?" - my internal reaction is " Ah, I once again forgot to pull out the meal to defrost or I forgot to run to the grocery store to pick up a few ingredients, now what will we eat?"

So, my goal this week is to dig back out some of my favorite cook books and recipes and get back to my weekly meal planning to stop my afternoon dinner scramble.

I found these FREE meal planning and shopping list printables at Craft Sew Create and thought you might like to use them as well to keep yourself from having the afternoon dinner scramble.

Click here to get you free printable Meal planner and shopping lists.


Glazed Lemon Pound Cake With Bisquick

It is a known fact that I am a Bisquick girl who enjoys finding a variety of creative ways to use her big yellow box and now one of my favorite bakery treats can be made with my box of Bisquick

Glazed Lemon Pound Cake 
from: Bisquick/Betty Crocker


Ingredients

Cake
2 1/2 cups Original Bisquick® mix
2/3 cup granulated sugar
1/4 cup butter or margarine, melted
3 eggs
3/4 cup milk
1 teaspoon vanilla
3 tablespoons grated lemon peel (fresh is best)
Glaze
1/2 cup powdered sugar
1 tablespoon lemon juice

 Instructions:
  1.  Heat oven to 325°F. Spray bottom only of 9x5-inch loaf pan with baking spray with flour. In large bowl, beat all cake ingredients except lemon peel with electric mixer on low speed 30 seconds, scraping bowl constantly. Beat on medium speed 2 minutes, scraping bowl occasionally. Stir in lemon peel. Pour into pan.
  2.  Bake 45 to 50 minutes or until toothpick inserted in center comes out clean. Cool 10 minutes. Loosen sides of cake from pan with metal spatula. Remove cake from pan to cooling rack. Cool completely, about 1 hour.
  3.  In small bowl, mix powdered sugar and lemon juice with spoon until smooth. Drizzle glaze over cake.

Frozen Lemonade Cupcakes For Mothers Day

As a little girl I would often visit my grandparents home and outside of their home was this huge   Lemon bush in which I  loved picking the lemons from and eating them just as I would an orange this must have been the beginning of my love for lemons.
Now I enjoy finding recipes that are lemon flavored especially baked goods. Here is the most recent one I found from Nestle and I think would be a perfect Mothers Day dessert.

Frozen Lemonade Cupcakes
from Nestle
You can have your lemonade and eat it too! Individually-sized pound cakes are dressed with a flavorful whipped topping and garnished with fresh lemon peel. Serve frozen for a refreshing anytime treat to stay cool this summer.

Ingredients:
  • 1 can (14 ounces) NESTLÉ LA LECHERA FAT FREE Sweetened Condensed Milk or NESTLÉ CARNATION Sweetened Condensed Milk
  • 1 container (6 ounces) frozen lemonade or limeade concentrate (about 2/3 cup), partially thawed
  • 1 tub (12 ounces) frozen light whipped topping, thawed
  • 1 (10.75 ounces) frozen reduced fat or fat free pound cake
  • Grated lemon peel (optional)
Instructions:
PAPER-LINE 18 muffin cups.

CUT pound cake into 18 slices. Using 1 3/4 inch-round cookie cutter or appropriate size to fit into paper liners, cut slices into rounds (discard cake scraps or save for another use). Place cake rounds into paper liners.

COMBINE sweetened condensed milk and lemonade concentrate in large bowl; stir well. Stir a large spoonful of whipped topping into mixture. Fold in remaining whipped topping. Spoon evenly into liners. Freeze for 2 hours. Cover; freeze for several hours or overnight before serving. Garnish with lemon peel.

Spring Cupcakes For Easter

Who knew that Tootsie Rolls could be shaped into bunny heads and Starburst candies could be chopped into chick beaks and rabbit noses? With a little bit of know-how and creativity, dash assistant editor Shannon McCook shows us how anyone can transform everyday candies and snack foods into adorable cupcake adornments.

Check out the how to instructions and videos on dashrecipes.com: Click here to go there now.

Fun Bunny Shaped Recipes For Easter Celebrations

Create a Hopping fun Easter celebration with these adorable Bunny shaped recipes.

 Bunny Pancakes
from: Pillsbury


Put a smile on your kids face Easter morning when you serve up these Bunny pancakes.  Click here for complete how to from Pillsbury.


How to Make Bunny Pancakes 

from: Muffin Tin Mom

The Muffin Tin Mom shows you step by step how to make these adorable Pink bunny pancakes for your Easter celebration.  Click here for instructions.

Bunny Puffs

from: Pillsbury

The kids will hop right over when you serve these charming rabbits, with a chocolate treat wrapped inside crescent roll dough.

Click here for recipe and instructions.


 Cinnamon Roll Bunnies

A tube of purchased cinnamon roll dough and a little imagination make these adorable bunnies almost too cute to eat! They’re sure to appeal to “somebunny” at your house this Easter. Click here for how to instructions


Easter Bunny Bread

From Taste of Home

These cute bunny breads are a must make for Easter meals. Kids of all ages love the chocolate egg surprise found inside. Click here to get full recipe.


Easter Bunny Rolls Recipe

From: Taste of Home

If you're planning an Easter feast, why not hop to it and roll these yummy Bunny rolls.  Click here for recipe


Bunny Veggie Tray 
from: Taste of Home

Serve up some healthy veggies in this adorable Bunny bread.  Click here for how to instructions and recipe.


Easter Bunny Cheese Spread

from: Taste of Home


We have all seen the holiday cheese spread balls - now you can create and serve your own Bunny Cheese spread  with this adorable Bunny shaped cheese spread.  Click here for how to instructions and recipe.


Bunny's Favorite Pizza

From: Nestle

This dessert pizza will be the hit at the kid's table at Easter this year. Click here for recipe.

How to prepare the perfect hard cooked egg


How to prepare the perfect hard cooked eggHard Boiled Egg Preparation

Our friends at the American Egg Board have offered their expertise so you can prepare the perfect hard cooked egg.

Directions:

1. PLACE eggs in saucepan large enough to hold them in single layer. ADD cold water to cover eggs by 1 inch. HEAT over high heat just to boiling.
Hard Boiled Egg Preparation 2. REMOVE fromburner. COVER pan. LET EGGS STAND in hot water about 15 minutes for large eggs (12 minutes for medium eggs; 18 minutes for extra large).
Easter Egg Preparation 3. DRAIN immediately and serve warm. OR, cool completely under cold running water or in bowl of ice water, then REFRIGERATE.
Easter Egg Preparation Complete Hard Cooking Instructions
Tips for preparing hard cooked eggs:
  • Hard-cooked, not hard-boiled. Although the cooking water must come to a full boil in this method, the pan is immediately removed from the heat so that the eggs cook gently in the hot water. This produces tender, not rubbery, eggs and minimizes cracking.
  • Banish the greenish ring. This harmless but unsightly discoloration that sometimes forms around hard-cooked yolks results from a reaction between sulfur in the egg white and iron in the yolk. It occurs when eggs have been cooked for too long or at too high a temperature. Our method – cooking eggs in hot, not boiling, water, then cooling immediately – minimizes this.
  • Very fresh eggs can be difficult to peel. To ensure easily peeled eggs, buy and refrigerate them a week to 10 days in advance of cooking. This brief "breather" allows the eggs time to take in air, which helps separate the membranes from the shell.
  • Hard-cooked eggs are easiest to peel right after cooling. Cooling causes the egg to contract slightly in the shell.
  • To peel a hard-cooked egg: Gently tap egg on countertop until shell is finely crackled all over. Roll egg between hands to loosen shell. Starting peeling at large end, holding egg under cold running water to help ease the shell off.
Storage time: In the shell, hard-cooked eggs can be refrigerated safely up to one week. Refrigerate in their original carton to prevent odor absorption. Once peeled, eggs should be eaten that day.
Food safety precaution: Piercing shells before cooking is not recommended. If not sterile, the piercer or needle can introduce bacteria into the egg. Also, piercing creates hairline cracks in the shell, through which bacteria can enter after cooking.
Never microwave eggs in shells. Steam builds up too quickly inside and eggs are likely to explode.
High altitude cooking: It's almost impossible to hard-cook eggs above 10,000 feet.

Dollar-Wise Dinners


Amy Hannold, 247Moms Frugal Living Editor

In one of my recent articles for Thrifty Thursday, I mentioned the importance of having some “Friday Falldown” meals, ready in your pantry.  I’ve had some requests to give some examples of those – and to share a few of my favorites.

The premise behind “Friday Falldown” meals is having appetizing meals, which are easy to prepare, ready for those nights when cooking is last on your “want-to-do” list.   Best success is found with comfort foods – these sound good when you’re tired.  Create a few and be ready to resist the urge to order take-out.

So, here go the ideas:

Freezer Finger Food Meals – Beyond Pizza:
Frozen chicken, fish, potatoes, and appetizer-type foods – or you could pair the meats with baked potatoes, and all of the fixin’s.  Commercially-made frozen entrees, or TV-Style dinners you’ve made for yourself from leftovers.  Our favorite is to splurge, nutritionally speaking, and enjoy some frozen pot pies – with salad, of course!  Buy these with coupons and stash ‘em away out of sight – until just the night you need them.

Eggs and Bacon – It’s Not Just For Breakfast:
A “backwards” meal, as my kids call it, is enjoying breakfast for dinner.  Already prepared pancakes or waffles (made on the weekends and frozen for quick meals) along with some “special treat” sausage, bacon or corned beef hash – voila – dinner is ready.  While I’m at it, I’ll share with you another comfort food breakfast.  It’s a German-side of the family delight called “Cornbread and Cocoa”.   Bake cornbread (or removed pre-make cornbread from the freezer).  Heat and enjoy slightly crumbled up in a bowl under a generous pouring of cocoa.  Yum!  My point is, whatever makes your family breakfasts special, enjoy them during the week, or on a Friday and all will be pleased.

Chicken or Beef, Freezer Marinated:
When I buy large quantities of chicken, pork, or beef steaks, I like to separate them in zippered freezer bags.  To the bag, I pour in some Italian salad dressing or cream of mushroom soup.  For four servings:  mix one can of cream of mushroom (or cream of chicken), one cup of water, ¾ cup of rice and some spices.  Toss with chicken breasts. Place into gallon-size freezer bag.  To enjoy, thaw the bag in your refrigerator, bake in a 9 X 13 pan at 375 for 45 minutes.   

Simmered Specialties:
Treat yourself to dinner ready when you arrive home – wouldn’t that smell great as you walked in from a busy day?  The same ingredients listed above with the freezer meals could be used in the crock-pot.  Italian dressing, mixed with onions and chicken into the crock-pot in the morning.  During the last hour of cooking, you can add other chopped vegetables such as mushrooms, peppers, tomatoes, etc.  Utilize your rice cooker at this same time, or cook pasta and a meal is ready!  The internet has many crock-pot, freezer and “once a month cooking” recipes – all you have to do is experiment and you’ll discover some new family favorite, easily prepared meals.


Share some of your “Friday Falldown” Meals:

FREE Meal Planner Printables


Two Free daily meal planner printables with grocery lists from The Project Girl Click here for your Free printables.

Stretch Your Family Meals


By Renae Chiovaro for Ideas That Spark


Cooking at home is the most economical way to feed your family. Here’s how to make the most of your time and money.
  • Cook once, eat twice. That doesn’t mean you have to serve the same meal each night! Cook extra servings of the main ingredient from which you can make several meals. A baked whole chicken could be used for tacos, a casserole or a salad. Plan your meals ahead and don’t just eat leftovers: Eat leftover makeovers!
  • Take time to plan a menu. Without a plan, it’s too easy to eat out. Recipes that call for seasonal ingredients are more affordable -- this is especially true for produce. Warm weather is a great time to visit the local farmers market for fresh produce at a lower price.
  • Substitute ingredients for items you have on hand. Most recipes can be altered with similar substitute ingredients. Don’t be afraid to deviate from the recipe.
  • Try cooking with less meat. Meat is the main ingredient in many recipes, and generally, it’s also the most expensive part of a meal. If a recipe, such as a casserole, calls for 1 pound of ground beef, try using half. Compensate with additional grains, pasta, rice or vegetables.
  • Serve smaller portions. Instead of plating a whole steak for each person, cut the meat into portions. Seconds can be served if needed.
  • When cleaning up, don’t immediately toss plate leftovers. If your kids are picky eaters but enjoyed the meal, contain leftovers for tomorrow’s meal, should they not enjoy what you’ll be serving tomorrow as much.
Stretching your meals is doable with a little planning and experimentation. Make the most of your meals by turning leftovers into new dishes and substituting ingredients. Most important, take inventory of your pantry and freezer and use items already available to you.

Free - Menu and Grocery List Printable


Simplify your meal planning and grocery shopping with his FREE printable from A Feathered Nest.  You will save time and money when you plan your weekly meals. Click here to get your FREE menu/grocery planner list.

Make Life Easier... Plan Out Your Meals!


Make Life Easier... Plan Out Your Meals!
By: Deanna Gemmer
24/7 MOMS Writer


I love to sit down and plan out meals for the week before I go to the grocery store. This helps with my food budget, as well as the frantic “what’s for dinner” rush in the evenings. I don’t attach meals to a specific day, instead pick 4-6 meals for the week and then in the morning or afternoon decide which one feels best for the day. Sometimes I’ll ask my husband for his opinion before he leaves for work so I can take meat out of the freezer or put the food in the crock pot.

Usually when I sit down to plan meals I pull out 5-7 cookbooks and just start flipping through recipes until I find one that looks good, or one that we’ve tried before that we liked. I’ll put a sticky note on that page, write down the recipe name and ingredients needed, and set that cookbook on top of the microwave for ready access when we’re set to cook.

But this system isn’t working for me anymore. For one, it takes too long. For second, I need a list of go-to recipes my family loves and I love to cook. In one place.

So when I stumbled on this blog post today I had a whole new burst of inspiration. Time to gather some supplies and get to work on putting my favorite family recipes all in one binder.

And printing out extra copies of this grocery/meal planning list to put right in front so they’re ready when I’m ready to plan? Brilliant!

A lot of my favorite recipes come from online sources (print out!) or magazines (tear out!) that can easily be put in the binder. But what should I do with the recipes in my beloved Better Homes & Garden book, or any number of other hard-backed cookbooks on my shelf?

A few ideas:
1) If you have the time, why not type out those recipes on your computer, print out, and put in the binder?
2) If you have a scanner or copier in your home, scan and print the recipe for your binder.
3) Keep a few sheets of blank paper in the back of your notebook. Add a handwritten note about the recipe, where to find it, and if you can, add a simple 4x6 picture you snapped before serving it to your family. (If you’re anything like me, I NEED a picture of a recipe before I’m even interested in attempting it!)

I’m moving at the end of the month, but once we are settled I fully plan to tackle this project. I can’t wait to have all our favorite recipes all in one place!

My Favorite Places to Find Crock Pot / Slow Cooker Recipes


- 1400 recipes from Southern Food. Click here to access them now

- 100's of recipes from Taste of Home. Click here to access and search now.

- A year of Slow Cooking is filled with 100's of yummy family recipes. Click here to go there now.

- 30 day Gourmet Freezer Cooking. Click here for great recipes you can freeze then cook later in your crock pot.

- Betty Crocker has created Slow Cooker videos to see just how to cook up their yummy recipes. Click here to see them now.

- All Recipes has a large variety of slow cooker recipes for yo to try out. Click here to go there now.

Where is you favorite place to find new Crock pot recipes?

Crock Pot Food Safety

During the winter months I tend to use my crock pot on a weekly basis slow cooking everything from soups to pot roasts. I often wonder about the safety of the food I am preparing in it and just what are the cooking instructions and suggestions when it comes to preparing meals for my family in my crock pot. Seek and you will find - I found a great list of crock pot food safety suggestions that I though might also interest you.

Crock Pot Food Safety

Info from About.com and FDA

140F. is the temp food needs to reach as quickly as possible- within 1 ½ hrs.

To test the temp of your crock pot fill w/ 2 qts. Water, cover and simmer on low heat for 8 hrs. Check the temp with a thermometer, it should read 185F. If it is higher your food may cook faster, so you will need to adjust your cooking time, but if it is lower you should discard the cooker and buy a new one.

If possible cook food on high the first hour, and then return to low.

1hr. on high is equal to about 2 hrs on low.

Experts say that you should not put frozen foods into your crock pot. Especially if you have at risk people in your household, under age 2, elderly, immune compromised.

You do not need to brown meats before adding to crock pot, except for ground meats. However, browning meat ahead reduces fat and adds flavor and color.

When preparing the night before for a crock pot meal, store meat and cut up vegetables separately in the refrigerator. Assemble in the morning

Vegetables cook faster than meat, so put them on the bottom

Fill crock pot no less than 1/2 full and no more than 2/3 full

Try not to remove the lid during cooking, each time you do it adds 20 min onto the cooking time

Place leftover in shallow containers and refrigerate. Do not put the crock into the frig. It will take too long to cool down and you will risk food poisoning.

Don’t reheat leftovers in the crock pot. It is not safe as it takes too long to reheat.

Power Outages and Crock Pots

In the event of a power outage and you have left your home with your crock pot going and return to discover the power is out, the food may not be safe. It is best to throw it out.

If a power outage occurs when you are home with your crock pot going, if the cooking is not done you need to finish that by another source, a gas stove, a neighbor’s house with power, a grill if possible.

If the food was done cooking when the power outage occurred it should be safe for up to 2 hrs with the lid on.

Cleaning your Crock Pot

It is very helpful to use a nonstick cooking spray prior to cooking. You can also purchase crock pot liners. Reynolds makes them.

Soak you liner in hot soapy water for 15- 20 minutes

Clean with a dish rag or a nylon net pad.

Never use an SOS pad or other harsh, abrasive cleaner.

Some things to consider when buying a crock pot

Size: Buy according to the size of your family. A 5-6 qt. pot works well for families of 4-5. For a larger family a 6-7qt. works better.

Removable Liner: Most new models have this feature now.

Elements: Should be on the sides and not just the bottom

Shape: Ovals are better suited to the shape of roasts and whole chickens

Features and Controls: Should have a least high and low. Some offer advanced pre-programmable features. An auto switch from high to low is very nice. Some have an auto shut-off as well.

Lid: Glass is nice, should seat well and the rim should not be difficult to clean

Handles: Need to be sturdy and stay cool so that you are able to lift and move the unit.


9 Theme Nights For Summer Express Meal Planning


Kids out of school + Hot summer days = Express Meal Planning


This summer when I sit down to make my weekly or monthly meal plans I will use my new list of 9 theme nights to assist me in creating an express meal plan. Quick and simple.


I will rotate these 9 theme nights over the summer choosing a variety of meals from each theme to feed my family without a lot of work.


You too can create a Summer Express meal plan with these 9 themed nights.


Pasta night – Raviolis, Spaghetti, Lasagna, Pesto sauce, Chicken Fettuccine Alfred, Macaroni and Cheese, Tortellini.


BBQ night – Hamburgers, hot dogs, steak , chicken, rib. Be Sure to also roast your veggies and potatoes over the BBQ for quick easy cleanup.


Build it yourself night – Pizza, tacos, burritos, baked potatoes, hamburgers, salad, camp stew, waffle.


Salad night – Cobb salad, taco salad, grilled steak salad, chicken Cesar salad, layered salad, spinach salad – Use left over meats to create your own salad.


Sandwich night – Grilled cheese, BLT, French dips, melts, Panini, wraps, deli style, Gyro's.


Dinner on a stick – Kabobs, hot dogs, roasted veggies and you can even serve your fruit on a stick.


Slow Cooker night – Toss it in the AM and forget about it all day. Use one the many recipes found on the 24/7 MOMS web site or google new Slow cooker recipes that your family will enjoy


Rotisserie Chicken night - Stop by the grocery store , Costco or Sam's club and pick up a Rotisserie chicken. Serve as is with side dishes and a salad . Or Click here for more simple recipes from 24/7 MOMS using a rotisserie chicken.


Left Over night - Empty out the fridge and create a left over night this can also include the items in your freezer. 1/2 opened bag of chicken fingers etc.


10 Easy Prep Foods You'll Always Find In My Freezer

by: Katie Kimball

For moms who work or who have young children demanding their time most of the day, it's tempting to rely on fast food or packaged dinners to make sure food gets on the table.

Between the added cost and strange additives, that's not an acceptable option for me. I want to cook from scratch and make healthy meals with real foods. Saving on prep time is essential.

My favorite strategy is to use my freezer space to the utmost (almost to abuse, probably). Just call me the freezer queen. Here are the items youíll always find ready to go in my freezer that make dinner prep go MUCH faster

  1. Peppers: sliced and chopped, sweet and spicy, I buy in the summer at the Farmerís Market for cheap and use them in soup, chili, stir fry, fajitas, ETC all year long. Peppers do not need to be blanched. Just donít eat them raw after freezing ñ yuck.

  2. Onions: chopped and in a bag, ready to throw in anything. I can chop extra onions while prepping an easy meal or even after the kids are asleep. I use my Pampered Chef chopper, one of my favorite kitchen gadgets ever!

    Onions need no blanching. If you try this, make sure to get the chopped onions in the freezer quickly so they donít start to get watery. Freeze the bag as flat (thin) as possible at first, even if you are going to store it in the door like I do for easy access. Also double bag for odor protection.

    You might have to bang them around on the counter to break up a big clump, but itís a good way to take out some aggression! I love that this also saves tears, because you only have to cut onions once for 5 meals or so.

  3. Celery: I have one bag of chopped celery for casseroles and soups and another of 3-inch sticks and leaves to throw into stocks and broths. No need to blanch. My celery would definitely go bad in the fridge every time I bought it if I didnít do this!

  4. Cubes of chicken broth: I make my own homemade chicken broth and freeze some of it in can-sized portions and some in ice cube trays. This is ideal for those doggone recipes that call for 1 cup of chicken broth. What are you supposed to do with the rest of the can? If you donít make your own broth, freeze ìthe rest of the canî in ice cube trays for next timeÖ Iím going to start freezing homemade cream of chicken soup, which I used in three freezable casseroles made in one hour as a modified once-a-month-cooking day.

  5. Cooked Bacon: Every time we have bacon, I fry up the whole pound and freeze the leftovers. It can be crumbled into recipes that call for cooked bacon, plus itís my favorite topping for homemade pizza. I also freeze pepperoni as soon as we open it.

  6. Lemon and Lime Juice: I try to find these on reduced produce, or at least a whole bag on sale. I juice them all and freeze in ice cube trays in 1 Tbs portions. They can be popped right into recipes like White Chicken Chili, or thawed and used for Homemade Guacamole.

  7. Summer fruit: sliced and sugared, whole. Mmmm, nothing beats June strawberries in the dead of winter. We use a lot of frozen fruit in yogurt (click homemade yogurt for my easy no dishes version!), so this is essential to have on hand, plus much less expensive to buy in season. Flash freeze sliced strawberries on a cookie sheet, and they're ready for yogurt. Freeze whole just in a bag for smoothies.

  8. Meatballs and Chicken Nuggets: Easy meals! I make at least 4-5 pounds of meatloaf mix every time I make it and just make a few meatloaves and a bunch of meatballs. I can just toss a dozen into a pot with a jar of sauce, and dinner is ready in 10 minutes. Homemade chicken nuggets are a tiny bit time consuming, and I love being able to do the dishes once for three meals or so. The nuggets freeze individually and can be popped out and warmed in the toaster oven in 10 minutes or less.

  9. Shredded zucchini: Another summer bounty item. I always buy four humongous ones for a dollar at the Farmerís Market, shred them all at once in the blender (or food processor) ñ notice doing less dishes is a theme here! ñ and freeze in Ziplocs in 2-cup portions for zucchini bread in the winter. You can also freeze cubed zucchini without blanching or shredded in ice cube trays to add to recipes. Sneak it into soups and casseroles, even jarred spaghetti sauce, to boost the veggie content of the meal.

  10. Walnuts: You canít beat the sales on walnuts just before Christmas when everyone is thinking about baking. I try to buy enough to last the whole year and just toss the thick bags in the freezer. I also chop a whole pound at a time in my blender and store that bag in the door of the freezer to add to quick breads and cookies.

  11. Bonus: A bag of leftover cooked veggies for soup. See this post for details.

  12. Another bonus: My philosophy and tips on how to cook extra meals and freeze in advance.

Did you appreciate these tips? Find more ways to make easy changes in your kitchen at the Monday Mission checklist.

Kitchen Stewardship is dedicated to helping people balance Godís calls to be good stewards of our earth, health, budget and time. Find out more about the mission here.

Author: Katie Kimball cooks real food and blogs about it at Kitchen Stewardship, where she balances her family's nutrition, the environment, a crunched budget and limited time. She is a Michigan mom of two young kiddos who strives to honor God through her writing and traditional food preparation.

Mothers Day Brunch Ideas

Raspberry-Cinnamon French Toast

from: Taste of Home

Ingredients

  • 12 slices cinnamon bread, cubed
  • 5 eggs, beaten
  • 1-3/4 cups milk
  • 1 cup packed brown sugar, divided
  • 1/4 teaspoon ground cinnamon
  • 1/4 teaspoon ground nutmeg
  • 1/2 cup slivered almonds
  • 1/4 cup butter, melted
  • 2 cups fresh raspberries

Directions

  • Place bread cubes in a greased 13-in. x 9-in. baking dish. In a bowl, combine the eggs, milk, 3/4 cup brown sugar, cinnamon and nutmeg; pour over bread. Cover and refrigerate for 8 hours or overnight.
  • Remove from the refrigerator 30 minutes before baking. Sprinkle almonds over egg mixture. Combine butter and remaining brown sugar; drizzle over the top.
  • Bake, uncovered, at 400° for 25 minutes. Sprinkle with raspberries. Bake 10 minutes longer or until a knife inserted near the center comes out clean. Yield: 6-8 servings.
minutes.

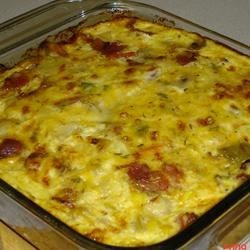
Egg and Bacon Casserole

Every Sunday is family breakfast day at our house. And I am not a big fan of eggs. But I found this great recipe that even the kids and I will eat!
from http://www.allrecipes.com/ It Will make a great addition to your Mothers Day Brunch menu and kids love it.

Submitted by: Tanya Peila


Ingredients
1 pound bacon
1 tablespoon butter
2 onions, chopped
2 cups fresh sliced mushrooms
4 cups frozen hash brown potatoes, thawed
1 teaspoon salt
1/4 teaspoon garlic salt
1/2 teaspoon ground black pepper
4 eggs
1 1/2 cups milk
1 pinch dried parsley
1 cup shredded Cheddar cheese

Directions

Preheat oven to 400 degrees F (200 degrees C). Grease a 9x13 inch casserole dish.

Place bacon in a large, deep skillet. Cook over medium high heat until evenly brown. Drain and set aside. In a separate skillet, melt the butter and fry onions and mushrooms until tender.

Place potatoes in bottom of prepared dish. Sprinkle with salt, garlic salt, and pepper. Top with bacon, then onions and mushrooms.In a large bowl, beat eggs with milk and parsley. Pour over casserole. Top with grated cheese. Cover and refrigerate overnight.

Bake in preheated oven for 1 hour or until set. If preparing and baking the same day, cook for 45


Luscious Lemon Fruit Dip Recipe

from: Taste of Home

Ingredients
  • 2 cups sugar
  • 2/3 cup cornstarch
  • 1 cup cold water
  • 4 eggs, beaten
  • 2/3 cup lemon juice
  • 2 teaspoons vanilla extract
  • 2 cups heavy whipping cream, whipped
  • Assorted fresh fruit

Directions

  • In a large heavy saucepan, combine the sugar and cornstarch. Gradually whisk in water until smooth. Cook and stir over medium-high heat until thickened and bubbly. Reduce heat; cook and stir 2 minutes longer. Remove from the heat.
  • Stir a small amount of hot mixture into eggs; return all to the pan, stirring constantly. Bring to a gentle boil; cook and stir 2 minutes longer. Remove from the heat. Gently stir in lemon juice and vanilla.
  • Transfer to a bowl. Cool to room temperature without stirring. Cover surface of mixture with waxed paper; refrigerate until cooled. Fold in whipped cream. Serve with fresh fruit. Yield: 5 cups.

Strawberry-Mint Smoothie

from: Nestle

Ingredients

4 large fresh or frozen strawberries, plus more for garnish
2 cups ice cubes
1/4 cup plain or vanilla sugar free, fat free yogurt
1/4 cup orange juice
1 packet No Sugar Added Classic French Vanilla Flavor CARNATION® INSTANT BREAKFAST ESSENTIALS™ Complete Nutritional Drink
1 packet artificial sweetener
2 mint sprigs, plus more for garnish

Directions
PLACE strawberries, ice, yogurt, orange juice, Carnation Instant Breakfast Essentials, sweetener and mint in blender; cover. Blend until smooth. Garnish with additional strawberries and mint.

Creating An Egg-stra Simple Easter Dinner

Easter is almost here and the planning has begun. 24/7 MOMS has discovered a few new recipes to help you create an Egg-stra simple Easter dinner.


Easter Ham with Cherry Sauce Recipe

from : taste of home

Ingredients

  • 1 fully cooked bone-in ham (6 to 8 pounds)
  • 1 cup packed brown sugar
  • 3 tablespoons maple syrup
  • 1 teaspoon ground mustard
  • 1/2 cup sugar
  • 3 tablespoons cornstarch
  • 1 cup cold water
  • 1 can (16 ounces) pitted dark sweet cherries, undrained
  • 2 tablespoons lemon juice
  • 1 teaspoon almond extract

Directions

  • Place ham in a roasting pan. Score surface of ham with shallow diagonal cuts, making diamond shapes. Combine the brown sugar, syrup and mustard; rub over ham and press into cuts.
  • Cover and bake at 325° for 1-3/4 to 2 hours or until a meat thermometer reads 140° and ham is heated through.
  • For cherry sauce, in a saucepan, combine the sugar, cornstarch and water until smooth. Add cherries. Bring to a boil; cook and stir for 2 minutes or until thickened. Remove from the heat; stir in lemon juice and extract. Serve with ham. Yield: 8-10 serving.

Creamy Cheesy Mashed Potatoes

from: Nestle

Ingredients

  • 6 medium (about 2 pounds total) potatoes, peeled and cut into 1-inch chunks
  • 3/4 cup NESTLÉ® CARNATION® Evaporated Milk
  • 1/4 cup (1/2 stick) butter or margarine
  • 1 cup (4 ounces) shredded cheddar cheese

Directions

PLACE potatoes in large saucepan. Cover with water; bring to a boil. Cook over medium-high heat for 15 to 20 minutes or until tender; drain.

RETURN potatoes to saucepan; add evaporated milk and butter. Beat with hand-held mixer until smooth. Stir in cheese. Season with salt and ground black pepper.

NOTE: Chopped green onions, chopped parsley or cooked, crumbled bacon may be added to mashed potatoes.

Parmesan - Garlic Butter Green Beans

from: Betty Crocker

Ingredients:

4 cups Green Giant® SELECT® frozen whole green beans

2 tablespoons butter

1 small clove garlic, finely chopped

1 tablespoon grated Parmesan cheese

Directions:

Cook green beans as directed on bag to desired doneness--except do not season to taste; drain.

Meanwhile, in 1-quart saucepan, melt butter over medium-low heat. Add garlic; cook 2 to 3 minutes, stirring frequently, until garlic is tender

Pour garlic butter over cooked green beans; stir to coat. Sprinkle with cheese; toss gently.


Baked Asparagus with Parmesan Cheese

By: California Asparagus Commission

INGREDIENTS:

1 lb asparagus
1 Tbl olive oil
2 ½ Tbl grated parmesan cheese
1 ½ Tbl soft white bread crumbs
2 tsp margarine

Preheat oven to 450 degrees.

Toss asparagus spears in 1-2 tsp olive oil and arrange in baking pan .

Sprinkle with cheese and bread crumbs. Drizzle with remaining olive oil.

Bake uncovered until asparagus is just tender, about 15 minutes.

Serves 4

Simple Broccoli Salad


Ingredients
1 bunch broccoli
1 bunch cauliflower
1 c cheddar cheese, shredded
1 chopped sweet onion
½ lb bacon, fried

Dressing
½ c mayonnaise
¼ c sugar
1 T. vinegar

Cut broccoli and cauliflower into Florette's. Add cheese, onion and bacon. Mix in dressing. Chill for 1 hour or more.

Easter Carrot Salad

Ingredients
2 pounds raw carrots sliced in circles
1 purple onion, sliced thin
1 green pepper thinly sliced
1/2 cup vegetable oil
1 cup sugar
1 teaspoon salad mustard
1 can tomato soup
3/4 cup white vinegar
1 teaspoon Worcestershire sauce

Directions

Place carrots in boiling water Blanch the carrots for about 30 seconds. Place into ice cold water to stop the cooking. Drain well.

Place carrots in a large bowl, add in onion and green peppers.

Mix remaining ingredients in a separate bowl then pour over carrots.

Cover bowl and place in refrigerator for 24 hours.


Adorable Edible Easter Dinner Rolls

from: Rhodes


4 St. Patricks Day Dinner Recipes


Corned Beef and Cabbage Diner
from: FamilyFun.com

The slow cooker is the perfect way to go for this traditional dish, since it must bubble away untended for hours, in any event. Be sure to serve with crusty bread, and Dijon mustard and horseradish on the side.
Ingredients
• 4 cups hot water
• 2 tbsp. cider vinegar
• 2 tbsp. sugar
• 1/2 tsp. freshly ground pepper
• 1 large or 2 medium onions, cut into wedges
• 1 3-lb. corned beef round or brisket, packaged with spices
• 8 small white or yellow potatoes, scrubbed and cut into quarters
• 1 head of green cabbage (about 1 1/2 lbs.), cored and cut into 10 wedges

*opitional - add in 1 small package of baby carrots

Instructions
1. In a 6-quart electric slow cooker, combine the water, vinegar, sugar, pepper and onions, mixing well. Place the corned beef in the mixture. Scatter the potatoes over the top and along the sides.
2. Cover and cook on the High heat setting 4 hours. Remove the lid and scatter the cabbage wedges over the top. Cover and continue cooking on High 3 to 4 hours longer or until the beef is tender. To serve, carve the beef into slices and serve with the cabbage and potatoes, with some of the cooking liquid spooned on top of the beef to keep it moist. Makes 6 to 8 servings.


Pasta with Pesto

*It doesn’t get easier than this. Use any kind of pasta you like
from www.dianaskitchen.com

Ingredients
• 2 cups fresh basil leaves, packed
• 1/4 cup grated Parmesan cheese
• 1/2 cup Olive oil
• 3 tablespoons pine nuts or walnuts
• 3 garlic cloves, finely minced

Directions:
Place basil leaves in small batches in food processor and whip until well chopped (do about 3/4 cup at a time). Add about 1/3 the nuts and garlic, blend again.
Add about 1/3 of the Parmesan cheese; blend while slowly adding about 1/3 of the olive oil, stopping to scrape down sides of container.
Process basil pesto it forms a thick smooth paste. Repeat until all ingredients are used, mix all batches together well. Serve over pasta. Basil pesto keeps in refrigerator one week, or freeze for a few months.


Stuffed Green Peppers
from: the Betty Crocker Cookbook

*I have made this over and over again and it never fails to please

Ingredients
6 large green peppers
5 cups boiling, salted water
1 pound ground beef
2 tablespoons chopped onion
1 teaspoon salt
1/8 teaspoon garlic
1 cup cooked rice
1 can (15 oz.) tomato sauce

Directions
Preheat oven to 350F.

Find a pot large enough to hold all the peppers and heat the water with salt added.

Cut a thin slice from the stem end of each pepper. Remove all seeds and membranes. Wash inside and out. Add peppers to the boiling water and boil for five minutes. Remove peppers from pot and drain.

In a sauté pan, cook and stir ground beef and onion until onion is tender. Drain off fat. Stir in salt, garlic, rice and one cup of tomato sauce. Heat through.

Lightly spoon each pepper with about 1/2 cup of the meat-rice mixture. Stand peppers upright in an ungreased baking dish. Pour remaining tomato sauce over peppers. Cover; bake for 45 minutes. Uncover, and bake 15 minutes longer. Add a little sprinkle of mozzarella cheese.


Irish stew Crockpot Irish Beef Stew
from Fix-It and Forget-It Cookbook


Ingredients:
2 lbs. stewing beef, cubed
1 envelope dry onion soup mix
2- 10 3/4 cans tomato soup
1 soup can water
1 tsp. salt
1/2 tsp. pepper
2 cups diced carrots
2 cups diced potatoes
1 lb. package frozen peas
1/4 cup water

Directions:
Place beef, onion soup, tomato soup, soup can of water, salt, pepper, carrots and potatoes in slow cooker. Cover. Cook on LOW 8 hours. Add peas and 1/4 cup water. Cover. Cook on LOW 1 more hour.