Showing posts with label 4th of July. Show all posts
Showing posts with label 4th of July. Show all posts
Last Minute Patriotic Dipped Strawberries
 from: 24/7 MOMS
1 Container of Strawberries
1 Bottle blue sugar sprinkles
1 bag white chocolate chips
Directions:
Wash strawberries ( leave stems on)
Pour blue sugar sprinkles into a bowl
Melt white chocolate chips in a microwaveable bowl stirring every 30 seconds until creamy.Dip washed strawberries into white chocolate leaving 1/2' of strawberry un-covered
Dip end of chocolate covered strawberry into blue sugar sprinkles about 1/2 inch deep.
place on wax paper to dry.
Last Minute 4th of July Sparkle Marshmallows

Sparkle Marshmallows On A Stick To Celebrate the 4th of July
from : Trisha Novotny
www.247moms.com
Ingredients
1 bag marshmallows
1 bottle red colored sugar sprinkles
1 bottle blue colored sugar sprinkles
1 bowl of water
wax paper
sucker sticks (optional)
Directions
Pour colored sugar into two bowls (one red, one blue)
Dip one end of marshmallow in to the water about 1/4 inch of more if desired
Dip wet end of marshmallow into one bowl of colored sugar rolling to cover edges
repeat on opposite end of marshmallow with other color of sugar.
Place on wax paper to dry
If using sucker sticks place into the bottom of one end.
OPTION: You can also dip these first in melted white chocolate then dip in the colored sugars for extra sweetness.
Free 4th Of July Celebration Printables

These Kaboose has a whole list of FUN 4th of July kid games and printables. Click here to visit Kaboose now.

4th of July Snack Cups
These would make perfect cups for kids to fill with their snacks during 4th of July celebrations. Print and stack a pile next to your chips and snacks on your buffet table. Skip to my lou created these festive snack cups. Click here to print yours.

Landee See, Landee Do create this free 4th of July printable that is perfect for framing and adding to your patriotic decorating. Click here to get your FREE printable.

4th of July Bingo
Play a fun game of 4th of July Bingo with these fun bingo cards you can download and print free over at bingo card printer. Click here to get yours now.

4th of July Road Sign Cupcake Toppers
Color Sizzle created these adorable free 4th of July Cupcake Toppers . Click here to get yours now.
Conversation Starters For the 4th of July

Are you hosting a pic-nic or 4th of July BBQ? then you will love these fun patriotic conversation starters from Happy Home Fairy to get everyone talking and involved in the celebration. Click here to download and print your FREE conversation starters.
Patriotic Trail Mix

Sweet and Yummy are what makes this patriotic treat perfect for your 4th of July celebration. Visit Apples to Zucchini for the complete recipe and how to instructions.
DIY MOMS - 4th Of July Poppers

4th of July Poppers
Create some confetti celebration fun with these 4th of July Poppers tat Alpha Mom designed. Click here for free how to instructions.
*Stop by each week for our DIY MOMS feature.
My Favorite Patriotic Cookie For The 4th Of July

Make these treatsthroughout the year by using different cookie cutter and food coloring.
Lemon Nut Star Cookies
SERVINGS: 33
METHOD: Baked
TIME: Prep: 25 min. + chilling Bake: 10 min./batch + cooling
METHOD: Baked
TIME: Prep: 25 min. + chilling Bake: 10 min./batch + cooling
Ingredients:
- 1 cup butter, softened
- 2 cups confectioners' sugar
- 2 eggs
- 2 tablespoons lemon juice
- 4 teaspoons half-and-half cream
- 2 teaspoons grated lemon peel
- 3-1/4 cups all-purpose flour
- 1/2 cup ground almonds
- 1/2 teaspoon baking soda
- 1/8 teaspoon salt
- GLAZE:
- 2 cups confectioners' sugar
- 1/4 cup light corn syrup
- 2 tablespoons lemon juice
- Red and blue food coloring
Directions:
Ina large bowl, cream butter and confectioners' sugar until light andfluffy. Add eggs, one at a time, beating well after each addition. Beatin the lemon juice, cream and lemon peel. Combine the flour, almonds,baking soda and salt; gradually add to creamed mixture. Cover andrefrigerate for 2 hours or until easy to handle.On a lightlyfloured surface, roll out dough to 1/8-in. thickness. Cut with afloured star-shaped cookie cutter. Place 1 in. apart on ungreasedbaking sheets. Bake at 350° for 8-10 minutes or until lightly browned.Remove to wire racks to cool.
For glaze, in a small bowl, combinethe confectioners' sugar, corn syrup and lemon juice until smooth.Divide into three bowls. Tint one portion red and one portion blue;leave the third portion plain. Spread over cookies; let stand overnightfor glaze to harden. Yield: about 5-1/2 dozen.
from:
Dessert Kabobs For The 4th of July

This 4th of July serve your dessert on a stick with this yummy homemade pound cake and fruit kabob. Click here to go to Taste and Tell for complete recipe and how to instructions for this yummy dessert.
Cupcake In A Jar For The 4th Of July
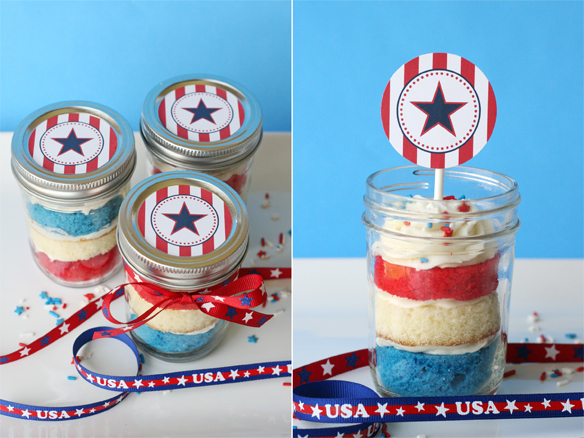
These Patriotic cupcakes in a jar are perfect for giving as gifts , serving for dessert or sending home as your party favor at this years 4th of July celebration. The Tomkat Studio gives complete how to instructions and even offers free cupcake toppers and labels to finish off your spectacular cupcake in a jar creations. Click here for you how to instructions.
Red, White and Blue Cupcakes For The 4th of July
 Red, White and Blue Cupcakes
Ingredients
White cake mix
Food coloring (red, blue, )
Cupcake Baking cups
Food coloring (red, blue, )
Cupcake Baking cups
- Instructions
- Prepareyour favorite white cake mix, then divide the batter evenly among threesmall bowls. Color one bowl of cake mix with red food coloring and onewith blue food coloring.
- Line cupcake pan withbaking cups. Evenly distribute the red , white and blue cake mix . Asyou fill them gently spread each layer of batter with the back of aspoon to cover the color underneath. I then placed a dab of red on topof each cupcake.
- Bake the cupcakes according cake mix directions.
- Frost and decorate as you choose.
FREE 4th of July Cupcake Toppers

Doll up your 4th of July cupcakes with these spectacular FREE cupcake toppers from Bella Grace Party design. Click here to get your Freebie downloads.

The Tomkat Studio created these free patriotic cupcake toppers that are perfect for your upcoming celebration. Click here to get your FREE printables.

Behind the Studio created a festive assortment of free printable 4th of July cupcake toppers. Click here to print yours and add that fun festive touch to your celebration.

Go red, white and blue with these fun cupcake toppers from A Place Out West. Click here to get your FREE cupcake printables.
DIY MOMS - Red, White & Blue
4th of July is right around the corner. To me the best memories I have of the 4th of July is when I am with my family and friends. When you gather all together and have a BBQ... kids are running around.... everyone is mingling... summer is HERE!
Celebrate in style with these great DIY Red, White & Blue decorations and ideas! The more you get in the spirit the more your guest will too!!
Pom-Poms
Vellum paper
Scissors
Double sided tape

 To make pom-poms, fold a 3-by-15-inch piece of vellum in half twice lengthwise. Cut slits every 1/8 inch, leaving inch at the top uncut. Unfold the paper, and attach a 1-inch piece of double-sided tape to one uncut corner; adhere to a bamboo skewer, and wrap the paper around several times. Once you reach the other end, use another piece of double-sided tape to secure. Curl the lower strips with the edge of a scissor blade, as you would a ribbon.
by Martha Stewart
...............................................................
Pinwheels
 •Scrapbook paper (preferably with double-sided pattern)
 •Wooden dowels
•Hot glue gun and hot glue
•Double-sided tape
•Scissors
•Star stickers
•Spray adhesive (if necessary)
1.To create dual-sided pinwheels, gather double-sided scrapbooking papers in patriotic hues, or if you can't find pages in palette, create your own. Find pages in contrasting patterns, and use the spray adhesive to adhere them together.
2.Cut paper into square shapes — we made 8-inch and 6-inch squares to create pinwheels of varying sizes.
3.Fold squares in half diagonally to create a triangle. Crease.
4.Open the triangle and fold diagonally the opposite way. Crease.
5.Open up the triangle and flatten out the square.
6.Cut along each diagonal fold three-quarters of the way to the center.
7.Pull the tip of every other corner toward the center. Use double-sided tape or white craft glue to adhere the first tip to the center, then each folded-in tip on top of each other. When you finish, you'll have the pinwheel shape.
8.If you want your pinwheel to spin, skip to step 10. If not, simply hot glue the pinwheel to your wooden dowel. Skip cutting down wooden dowels from the hardware or craft store and use inexpensive flag dowels (removing the flags, of course).
9.Finish your pinwheel with a decorative star sticker in the center.
10.If you want your pinwheel to spin, you'll need to push a pin through the center (a straight pin works), then a bead beneath the pinwheel. You'll drive the pin into your dowel with a hammer. If needed, fold over (or cut and then fold over) any part of the pin that sticks through to the back to prevent injuries.
by good housekeeping
..............................................................

Letter-size, stationery-weight paper in red, white, and blue
Paper cutter or scissorsby censational girl
Ruler
Pencil
Bone folder
Mini-stapler
1/8-inch hole punch
White cotton string
1. Cut paper to 6 by 11 inches. Using a bone folder to make crisp folds, fold the paper in half; then, fold it in half twice more. Open the folded paper, and use the creases as guides to accordion fold the paper to resemble a fan.
2. With the paper still folded, find the center, and mark it with a pencil. Use a desktop stapler to staple the center. (The staple should be perpendicular to the folds.)
3. Make a mark, 1 inch from each end on the folded side of the fan. Using scissors, trim both ends of the paper on an angle, starting from the 1-inch marks and cutting to the paper's edges.
4. Fan out the paper to form a star, and bring the ends together. Staple the ends together with a mini-stapler.
5. With a 1/8-inch hole punch, punch 2 holes, one fold apart from each other. Thread cord through one hole, around the back of the star, and then through the other hole.
by martha stewart
.......................................
Star-Spangled Luminarias

Brown paper sacks
Blue and Red tissue paper
Glue stick
Tea light candle
1. Cut a star from cardboard (ours was 2 1/2 inches from point to point) and use it as a template to cut other stars from red and blue tissue paper.
2. Glue the stars to the insides of lunch bags with a dab or two from a glue stick. For a bit more pop, add other small star-shaped stickers on the inside and perforate the sides with a star paper punch.
3. Fill each bag with 2 to 3 inches of sand and sink a tea light or votive candle into the sand. Place the luminarias in a spot outside where you can keep an eye on them, and light the candles. (Tip for parents: To avoid scorching your forearm, light a piece of uncooked spaghetti and use it to light the candles.)
4. From inside the bags, the tissue paper stars will cast a red and blue glow guaranteed to shine on long after the twilight's last gleaming.
by family fun
.........................................................
Wreath

Foam or straw wreath
Die cut stars
(or print out from computer an cut on cardstock)
Hot glue gun
If you use straw wreaths do not unwrap the plastic.. you will just end up making a mess.
1) Start with one color and glue down one end and start wraping. You might want to premark the wreath on where you want each color to be so you don't get confused.
2) Once you get all the ribbon around then you can glue on the stars. If you want to make them different heights you can hot glue them to little objects first then glue to the wreath.
Now you have a 4th of July wreath that is super cute and inexpensive!
by the creative imperative.blogspot.com
.....................................................
 Easy Sand Candles
Red, White and Blue sand
Various glasses or vases
Skinnier glass to fit inside
Tea light candle
 by martha stewart
Firecrackers

Toliet paper tubes
Felt sheets (paper size), cut in half
Ribbon
Decorative paper
Double sticky tape
Small toys or candy
1) Fill the tube with candy, gifts or toys.
2) Take you felt and wrap it around the tube. Tie each end with a piece of ribbon.
3) Now you can be creative on what you want to do. You can leave it as is or you can use some decorative paper and stamps or write a persons name on them or you could even write 4th of July on it. Wrap it around and use the double sticky tape to hold it together. Great for party favors, decorations, placecards, etc...
by fantasy celebrations
........................................................
Festive Cans

Ribbon
Hot glue gun
Double sticky tape
Flowers
Flags
Add a bit of ribbon with hot glue to the back seam. Then use double sided tape to guide your ribbon around the canister, and keep it straight. Use one more dab of hot glue to keep the other end of the ribbon in place.


An Unexpected Tradition

I didn'tknow I was creating a tradition. What I wanted to do was make Fourth of July as patriotic as possibleconsidering I lived in southern California where we don't have the Boston Popsor the Washington Monument. When Iwas very young, my brothers and sisters piled into the back of the stationwagon and my dad drove practically non-stop from California to Indiana for afew weeks every few summers. Oneday we were visiting relatives in the small Indiana town of Jasonville where mydad grew up. In no time at all, ahorse and wagon was hitched up; children mounted their horses, and we paradeddown Main Street in our own personal small town parade. Those were the days you didn't need apermit, a holiday, or any reason for a parade except we'd come to town and itwould be fun.
The onlyway to recreate the small town parade while living in southern California wasto put together a Fourth of July neighborhood street parade. We made homemade invitations and thechildren passed them out door-to-door. They encouraged people to participate even if they just wanted to clapas the parade went by. After all,a parade needs spectators to wave and cheer.
At 10a.m. on the Fourth, children on decorated tricycles and bikes, parents pullingflag festooned wagons, and everyone wearing their red, white, and blue. Everyyear I made patriotic tee shirts and one year I made sashes that said"America", "Freedom", and "Liberty". These were very simply made. I cut out fabric letters and sewed themon muslin. I didn't bother withperfection because I was going for the country casual look.
Ourparade had a boom box playing patriotic music instead of a marching band. My dad, a former F.B.I. agent was putin charge of security. He walked onahead and made sure to stop any cars and that the route was safe. People would get out of their cars andenjoy the parade. At the end ofthe parade, everyone gathered in our driveway for lemonade and flagcookies.
Laterthat day we always had old fashioned hand cranked ice cream. If you didn't take your turn crankingand filling the oak barrel with salt and ice, you didn't eat ice cream. There were a few years when I wasn'tsure my nephew, Jason, was going to get any ice cream, but eventually he'd take his turn.
As it wasgetting dark, the kids would be anxious to go to the top of the hill in PortolaHills and watch fireworks from El Toro Marine Base, Laguna Beach, and othercoastal cities. A perfectending of a day that turned into a holiday tradition.

Nancy Nemitz, owner of Create the Space Professional Organizing LLC, works with busy families, professional athletes, small businesses, and moms to create an organized space for them to live and work. She's been featured on this year's Season Finale of TLC's Hoarding:Buried Alive, "It's A Freakin War Zone". Nancy has four grown children and has been married for 35 years.
Nancy's Wesbite is www.createthespace.com http://createthespace.com/residential-services
4 Sweet Treats For 4th Of July Celebrating
 Sprinkled Dipped Ice Cream Sandwich's
Patriotic Ice Cream Sandwich's on a stick are a quick festive dessert that even the kids can help to create.
Living Locurto gives us complete how instructions by clicking here.
Flag Cupcakes

Patriotic Cupcakes are simple to make for the 4th of July celebrations. We found this fun idea over at The Cupcake recipes. Click here to visit their site now and get full instructions.

Flag Cookies On A Stick
Pillsbury ready to bake Flag cookies make great Cookies on a stick for creating favors, centerpieces or simple to eat dessert. Click here for instructions.

Patriotic Pop-Corn
Red, white and blue pop corns makes every 4th of July celebrations fun. This is a great treat of a pic-nic, party favor or sweet treat at your celebration from Clair's Creations. Click here for complete recipe and how to instructions.

Patriotic Non-Alcoholic Drink
Fun to make fun to drink. Kids can help serve up these patriotic drinks with the simple instructions over at The Kool Stuff. Click here for recipe. * note: we used regular 7up and it still worked just fine.
Three Free 4th of July Subway Art Printables

Today's Fabulous Finds offers eleven 4th of July subway art choices in designs and colors all for FREE. Click here to choose and print our your favorite art for framing.

It's a Muegge Life created a free festive 4th of July subway art that looks fabulous in a red frame. Click here to download your free subway art.

Eye Candy Event Details created a free 4th of July subway art that you can download by clicking here.
Pringles Cans Create 4th Of July Firecrackers
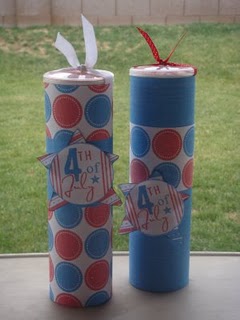
Re-use your empty Pringles cans to create 4th of July firecracker decorations that are perfect as a table centerpiece. Sisters Stuff shares her how to's by clicking here. When I made them I went to my local Scrapbook store and purchased 4th of July paper
Centerpiece For The 4th Of July
This 4th of July craft idea is a great way to decorate your picnic table this summer. Your table will be decked out in red, white, and blue with this painted firecracker centerpiece.

Materials:
- Old broom handle
- Power saw or hand saw
- Sandpaper
- Paint--red, white, blue, and yellow
- Brown ink
- Pushpin
- Wire
- Pencil
- Superglue
- Wooden craft stars
- Hot glue gun and glue
- Wooden base
Instructions:
- Cut old broom handle into sections of varying lengths with your saw.
- Sand all of your handle sections down if they are rough or have paint on them.
- Paint handle sections. After they are dry, add a bit of brown ink and smudge it around to make them look a bit antique.
- Sand them again.
- Use a push pin to poke a hole in the top of each firecracker piece.
- Cut a random length of wire and wrap it around a pencil to curl it. Leave both ends straight to attach to the firecracker and to the star.
- Use Superglue to attach the wire to broom handle sections. Just put a little dab over the hole you made with your push pin and stick in your wire.
- Paint wooden craft stars and sand them down.
- Attach painted stars to the other end of the wire using hot glue.
- Attach the firecrackers to the wooden base with hot glue.


Find this project with 20 different 4th of July crafts in the 4th of July Crafts: Blogger Edition 2010 eBook.
Don’t Forget Your Wagon This Fourth of July
 With more than a dozen styles and almost 100 years of history, the Radio Flyer red wagon is
the essential toy for a classic outdoor adventure this Independence Day
As America prepares to celebrate the Fourth of July, and herald the official start to the season of
summer fun and outdoor play, Radio Flyer, the makers of the famous little red wagons beloved
by generations of families, is proud to remind both kids and adults alike to not forget their
wagons as they head out to enjoy the patriotic festivities. A children’s staple since 1917, the
iconic Radio Flyer wagon is one of the most beloved American institutions. Boasting more than
a dozen award-winning wagon models and a complete line of tricycles, scooters, and othe
 r ride-
ons, Radio Flyer is as synonymous with outdoor play as summer itself.
Nearly everyone has their own childhood memories of playing outdoors with a Radio Flyer
wagon in the summertime. This Fourth of July, keep the tradition alive. Bring your child on an
outdoor adventure to the parade, cookout, and to see the fireworks in a Radio Flyer Wagon.
Your child will look back on these summer days with the same sense of joy and wonder that you
do.
Fun things to do with your Radio Flyer Wagon this Fourth of July :
1. Take your Radio Flyer wagon to a Fourth of July Parade – make sure to decorate it
festively so you stand out from the crowd.
2. Adventure to the park in your Radio Flyer to watch the fireworks– it’s easy for little ones
to lie down in their wagon a see the fireworks in the sky.
3. Pack the kids and a picnic in your little red wagon when heading to the beach, lake or
pool for a day of family fun and barbequing.
Don’t forget your Radio Flyer license to fly this Fourth of July!
Visit the Radio Flyer’s License Bureau and create your child’s very own custom license! It’s as
easy as one, two, three: upload a photo, chose your favorite Radio Flyer toy and print. Visit
www.RadioFlyerLicense.com to get yours now!
Subscribe to:
Posts (Atom)